未专门声明的情况,都是 1.8 的代码。
hash函数 确定桶的算法:
本质是为了将 hash 这个 int 通过取模,获得一个数组上的一个位置,这个获取需要均匀,等价于 i = hash % n。有点类似数据库分库分表的路由算法。
在 n 为 2 的 n 次方时,i = (n - 1) & hash 等价于 i = hash % n。并且性能更好,位运算比求余计算性能更好。
那么为什么在 n 为 2 的 N 次方时,i = (n - 1) & hash 等价于 i = hash % n?
hash % n,按照十进制算,就是 hash 除以 n 以后,余数就是取余的结果。如果按照二进制的除法考虑,n 是 2 的 N 次方,那么,比如 hash 为 11 即 1011,n 为 4 即 100,二进制数的除法 1011 除以 100,相当于把 1011 左边的两位抹去,最终得到 11,十进制值是 3,就是最终的余数。也就是说,如果除数的位数减一是 A,那么取余的结果就是被除数的最后 A 位。https://zhuanlan.zhihu.com/p/458305988
那么这里解释了为什么 HashMap 的数组的容量必须是 2 的 n 次方,因为如果不是,就达不到均匀针对 hash 值取余的效果,无法将 k-v 对均匀的落到数组的每一个桶上。https://www.cnblogs.com/java1024/p/13488714.html
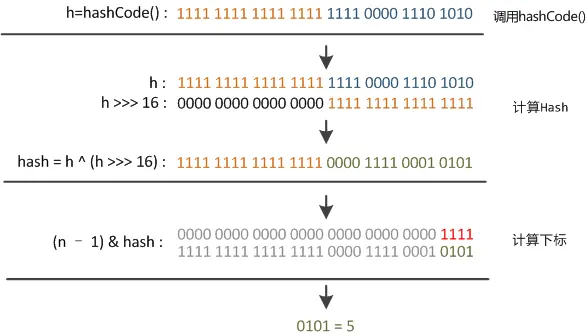
内部 hash 值计算:
1
2
3
4
static final int hash (Object key) { int h; return (key == null ) ? 0 : (h = key.hashCode()) ^ (h >>> 16 ); }
n 为偶数,那么 n - 1 的二进制表示全为 1,比如 n 为 8,n - 1 为 7,7 的二进制是三个 1。此时 i = (n - 1) & hash 实际是只针对 hash 的低位进行散列,这也会有问题。如果被 put 进来的 key 的 hashCode 的低位全是一致的,那么就会产生激烈的 hash 碰撞。
解决办法:将 hash 右移动 16 位,并与 hash 的原值做异或运算,得到的结果再做真正的散列。
为什么这么做?右移动 16 位以后,将 int 的高 16 位移动到了低 16 位,再和原 hash 做异或,可以让 hash 的高 16 位也参与到最终的散列中来,避免仅仅取低位进行散列造成的 hash 碰撞。
那么为什么用异或呢?异或的规则是「两个位相同时为 0,相异为 1」,根据高低位的不同情况:
高位
低位
异或结果
1
1
0
0
1
1
1
0
1
0
0
0
如果低位固定的情况,高位的变动能显著影响最终的结果,比如低位固定 1,高位位 1 和 0 的情况下,最终的结果不一样,那么在高位对低位执行异或以后,可以结合高位和低位产生一个更离散的 hash 值。避免了仅用 hashCode 的低位去做散列导致的哈希冲突。
初始容量 初始数字长度,根据 initialCapacity 计算的得到,计算的方法是 tableSizeFor:
1
2
3
4
5
6
7
8
9
static final int tableSizeFor (int cap) { int n = cap - 1 ; n |= n >>> 1 ; n |= n >>> 2 ; n |= n >>> 4 ; n |= n >>> 8 ; n |= n >>> 16 ; return (n < 0 ) ? 1 : (n >= MAXIMUM_CAPACITY) ? MAXIMUM_CAPACITY : n + 1 ; }
目的是取大于等于 initialCapacity 的 2 的 n 次幂的数,比如 initialCapacity 为 8 则返回 8,initialCapacity 如果是 15,则返回 16。
n |= n >>> 1 先将 n 友移 1 位,再与原来的 n 求活运算,实际的结果是把 n 最高位右边的第一位设置为 1。n |= n >>> 2 以及后面一直到 16 都一样,将 n 最高位的 1 右边的所有位都设置为 1。此时再针对 n 操作 + 1,刚好整体进 1 位,得到一个 2 的 n 次幂的数。
针对 cap 的减一操作是为了针对 cap 已经是 2 的 n 次幂的数场景,如果不减 1,假设 cap 为 8,那么最终的结果会是 16。只有对 cap 减 1 以后,最终得出的结果才是 8。https://www.cnblogs.com/loading4/p/6239441.html
如果默认构造器,也就是不指定任何参数,那么 hash 表数组初始化的长度是 DEFAULT_INITIAL_CAPACITY,也就是 16。
加载因子 如果初始容量大于最大条目数除以负载因子,则不会发生重新哈希操作。
1 threshold = capacity * load factor
HashMap 中的键值对数量超过阈值 threshold 时会扩容数组,threshold 会有一个初始值,初始值通过 tableSizeFor 计算得到,前面已经描述过。
put 方法 1 2 3 4 5 6 7 8 9 10 11 12 13 14 15 16 17 18 19 20 21 22 23 24 25 26 27 28 29 30 31 32 33 34 35 36 37 38 39 40 41 42 43 44 45 46 47 48 49 50 51 52 53 54 55 56 57 58 59 public V put (K key, V value) { return putVal(hash(key), key, value, false , true ); } final V putVal (int hash, K key, V value, boolean onlyIfAbsent, boolean evict) { Node<K, V>[] tab; Node<K, V> p; int n, i; if ((tab = table) == null || (n = tab.length) == 0 ) n = (tab = resize()).length; if ((p = tab[i = (n - 1 ) & hash]) == null ) tab[i] = newNode(hash, key, value, null ); else { Node<K, V> e; K k; if (p.hash == hash && ((k = p.key) == key || (key != null && key.equals(k)))) e = p; else if (p instanceof TreeNode) e = ((TreeNode<K, V>) p).putTreeVal(this , tab, hash, key, value); else { for (int binCount = 0 ; ; ++binCount) { if ((e = p.next) == null ) { p.next = newNode(hash, key, value, null ); if (binCount >= TREEIFY_THRESHOLD - 1 ) treeifyBin(tab, hash); break ; } if (e.hash == hash && ((k = e.key) == key || (key != null && key.equals(k)))) break ; p = e; } } if (e != null ) { V oldValue = e.value; if (!onlyIfAbsent || oldValue == null ) e.value = value; afterNodeAccess(e); return oldValue; } } ++modCount; if (++size > threshold) resize(); afterNodeInsertion(evict); return null ; }
冲突处理:不同的 hash 值落到 hash 表相同的桶时,采用链表处理。
1.8 版本,链表长度达到一定程度以后,链表转为红黑树。在 put 的时候,如果 hash 冲突,并且尾插法入链以后链表长度超过 8,此时尝试将链表转化为红黑树。
操作链表转红黑树的方法 treeifyBin:
1
2
3
4
5
6
7
8
9
10
11
12
13
14
15
16
17
18
19
20
21
22
final void treeifyBin (Node<K,V>[] tab, int hash) { int n, index; Node<K,V> e; if (tab == null || (n = tab.length) < MIN_TREEIFY_CAPACITY) resize(); else if ((e = tab[index = (n - 1 ) & hash]) != null ) { TreeNode<K,V> hd = null , tl = null ; do { TreeNode<K,V> p = replacementTreeNode(e, null ); if (tl == null ) hd = p; else { p.prev = tl; tl.next = p; } tl = p; } while ((e = e.next) != null ); if ((tab[index] = hd) != null ) hd.treeify(tab); } }
哈希表扩容 JDK 1.7 1 2 3 4 5 6 7 8 9 10 11 12 void resize (int newCapacity) { Entry<?,?>[] oldTable = table; int oldCapacity = oldTable.length; if (oldCapacity == MAXIMUM_CAPACITY) { threshold = Integer.MAX_VALUE; return ; } Entry<?,?>[] newTable = new Entry <?,?>[newCapacity]; transfer(newTable, initHashSeedAsNeeded(newCapacity)); table = newTable; threshold = (int )Math.min(newCapacity * loadFactor, MAXIMUM_CAPACITY + 1 ); }
1 2 3 4 5 6 7 8 9 10 11 12 13 14 15 16 17 18 19 20 void transfer (Entry<?,?>[] newTable, boolean rehash) { Entry<?,?>[] src = table; int newCapacity = newTable.length; for (int j = 0 ; j < src.length; j++) { Entry<K,V> e = (Entry<K,V>)src[j]; while (null != e) { Entry<K,V> next = e.next; if (rehash) { e.hash = null == e.key ? 0 : hash(e.key); } int i = indexFor(e.hash, newCapacity); e.next = (Entry<K,V>)newTable[i]; newTable[i] = e; e = next; } } }
遍历老哈希表数组,如果数组位存在链表结构,则用 k-v 节点的 next 引用遍历整个链表。
针对遍历到的每个 k-v 节点,根据 hash 值计算在新数组上的下标,再在对应位置的链表头部插入当前 k-v 节点。
JDK 1.8 1 2 3 4 5 6 7 8 9 10 11 12 13 14 15 16 17 18 19 20 21 22 23 24 25 26 27 28 29 30 31 32 33 34 35 36 37 38 39 40 41 42 43 44 45 46 47 48 49 50 51 52 53 54 55 56 57 58 59 60 61 62 63 64 65 66 67 68 69 70 71 72 73 74 75 76 77 78 79 80 81 final Node<K, V>[] resize() { Node<K, V>[] oldTab = table; int oldCap = (oldTab == null ) ? 0 : oldTab.length; int oldThr = threshold; int newCap, newThr = 0 ; if (oldCap > 0 ) { if (oldCap >= MAXIMUM_CAPACITY) { threshold = Integer.MAX_VALUE; return oldTab; } else if ((newCap = oldCap << 1 ) < MAXIMUM_CAPACITY && oldCap >= DEFAULT_INITIAL_CAPACITY) newThr = oldThr << 1 ; } else if (oldThr > 0 ) newCap = oldThr; else { newCap = DEFAULT_INITIAL_CAPACITY; newThr = (int ) (DEFAULT_LOAD_FACTOR * DEFAULT_INITIAL_CAPACITY); } if (newThr == 0 ) { float ft = (float ) newCap * loadFactor; newThr = (newCap < MAXIMUM_CAPACITY && ft < (float ) MAXIMUM_CAPACITY ? (int ) ft : Integer.MAX_VALUE); } threshold = newThr; @SuppressWarnings({"rawtypes","unchecked"}) Node<K, V>[] newTab = (Node<K, V>[]) new Node [newCap]; table = newTab; if (oldTab != null ) { for (int j = 0 ; j < oldCap; ++j) { Node<K, V> e; if ((e = oldTab[j]) != null ) { oldTab[j] = null ; if (e.next == null ) newTab[e.hash & (newCap - 1 )] = e; else if (e instanceof TreeNode) ((TreeNode<K, V>) e).split(this , newTab, j, oldCap); else { Node<K, V> loHead = null , loTail = null ; Node<K, V> hiHead = null , hiTail = null ; Node<K, V> next; do { next = e.next; if ((e.hash & oldCap) == 0 ) { if (loTail == null ) loHead = e; else loTail.next = e; loTail = e; } else { if (hiTail == null ) hiHead = e; else hiTail.next = e; hiTail = e; } } while ((e = next) != null ); if (loTail != null ) { loTail.next = null ; newTab[j] = loHead; } if (hiTail != null ) { hiTail.next = null ; newTab[j + oldCap] = hiHead; } } } } } return newTab; }
不同场景的扩容(resize) 1、调用无参数构造器初始化
1 HashMap map = new HashMap ();
newCap 取 DEFAULT_INITIAL_CAPACITY,也就是 16。
2、调用有参数构造器初始化
1 HashMap map = new HashMap (4 , 0.75f );
newCap 取初始化时算出的 threshold,也就是 4,threshold 的初始化逻辑见前述的 「初始容量」小节。
3、容量超过 threshold 以后的扩容
1、如果当前数组容量 oldCap 大于等于 16(DEFAULT_INITIAL_CAPACITY),newThr 取当前的 threshold(oldThr)乘以 2。
2、如果小于,newThr 取 newCap 乘以 loadFactor(加载因子),loadFactor 的值为构造函数传入的值。
关于第一点有个疑问:这种场景,为什么要取 oldThr 乘以 2 ?
答:首先有个规则,当数组容量 capacity 大于 MAXIMUM_CAPACITY 时, threshold 取 Integer.MAX,也就是不再扩容,无视 hash 碰撞。在 capacity 小于 MAXIMUM_CAPACITY 时,threshold 的计算方法永远是 capacity 乘以 loadFactor。
1 threshold = newCap * loadFactor = (oldCap * 2) * loadFactor = (oldCap * loadFactor) * 2
又因为
1 oldCap * loadFactor = oldThreshold
所以
1 threshold = oldThreshold * 2
计算逻辑经过转化以后,可以直接用位运算体现乘法,能提升性能:
这里的逻辑,如果 oldCap 乘以 2 以后超过了 MAXIMUM_CAPACITY,那么 threshold 也要取最大值,也就是 Integer.Max。这部分逻辑在后面提现:
1 2 3 4 5 6 7 if (newThr == 0 ) { float ft = (float ) newCap * loadFactor; newThr = (newCap < MAXIMUM_CAPACITY && ft < (float ) MAXIMUM_CAPACITY ? (int ) ft : Integer.MAX_VALUE); }
1.8 针对扩容的变化 首先 k-v 节点从老哈希表迁移到新哈希表时,新的数组下标的计算采用了新的方式。
1 2 3 4 5 6 7 static int indexFor (int h, int length) { return h & (length-1 ); } int i = indexFor(e.hash, newCapacity);... = newTable[i];
1.8 的方式,简化后的代码
1 2 3 4 5 6 7 8 if ((e.hash & oldCap) == 0 ) { newTab[j] = ..; } else { newTab[j + oldCap] = ..; }
这里用 hash 值和扩容前的哈希表数组长度求余,得到 0 时,在新数组的下标不变;在非 0 时,在新数组的下标为老数组下标加 oldCap。
为什么能这么处理呢?本质上这里也是为了做取余。
前面「hash函数」小节中已经提到过,h & (n-1) 其实是对 n 取模。如果 n 的位数减一是 A,那么这个取模运算本质是取二进制 h 的右边 A 位。更详细的见前面的小节。
扩容以后,新数组的容量扩展为原来的 2 倍,也就是 n 的二进制位数多一位,取余的计算则是对二进制 h 取右边 A + 1 位。
如果是 0,则取余结果,也就是新数组的下标和原数组下标一致,
如果是 1,则取余结果,也就是新数组的下标为原数组下标 + 原数组容量。
自己的分析:光就取模运算本身,也就是计算在新数组的下标这个点上,其实没什么差别,在性能上没有明显的区别。那么为什么用做这个变动呢?
1.8 的方式就计算新下标本身是和 1.7 没什么区别,有意思的点是 1.8 的方式明确知道了 hash 值在新数组的下标要么是 j,要么是 j + oldCap。猜测可以利用这个点做一些优化。
网上一般的说法,可以在并发下,避免 1.7 transfer 方法链表成环,造成死循环。https://tech.meituan.com/2016/06/24/java-hashmap.html 「线程安全性」一节
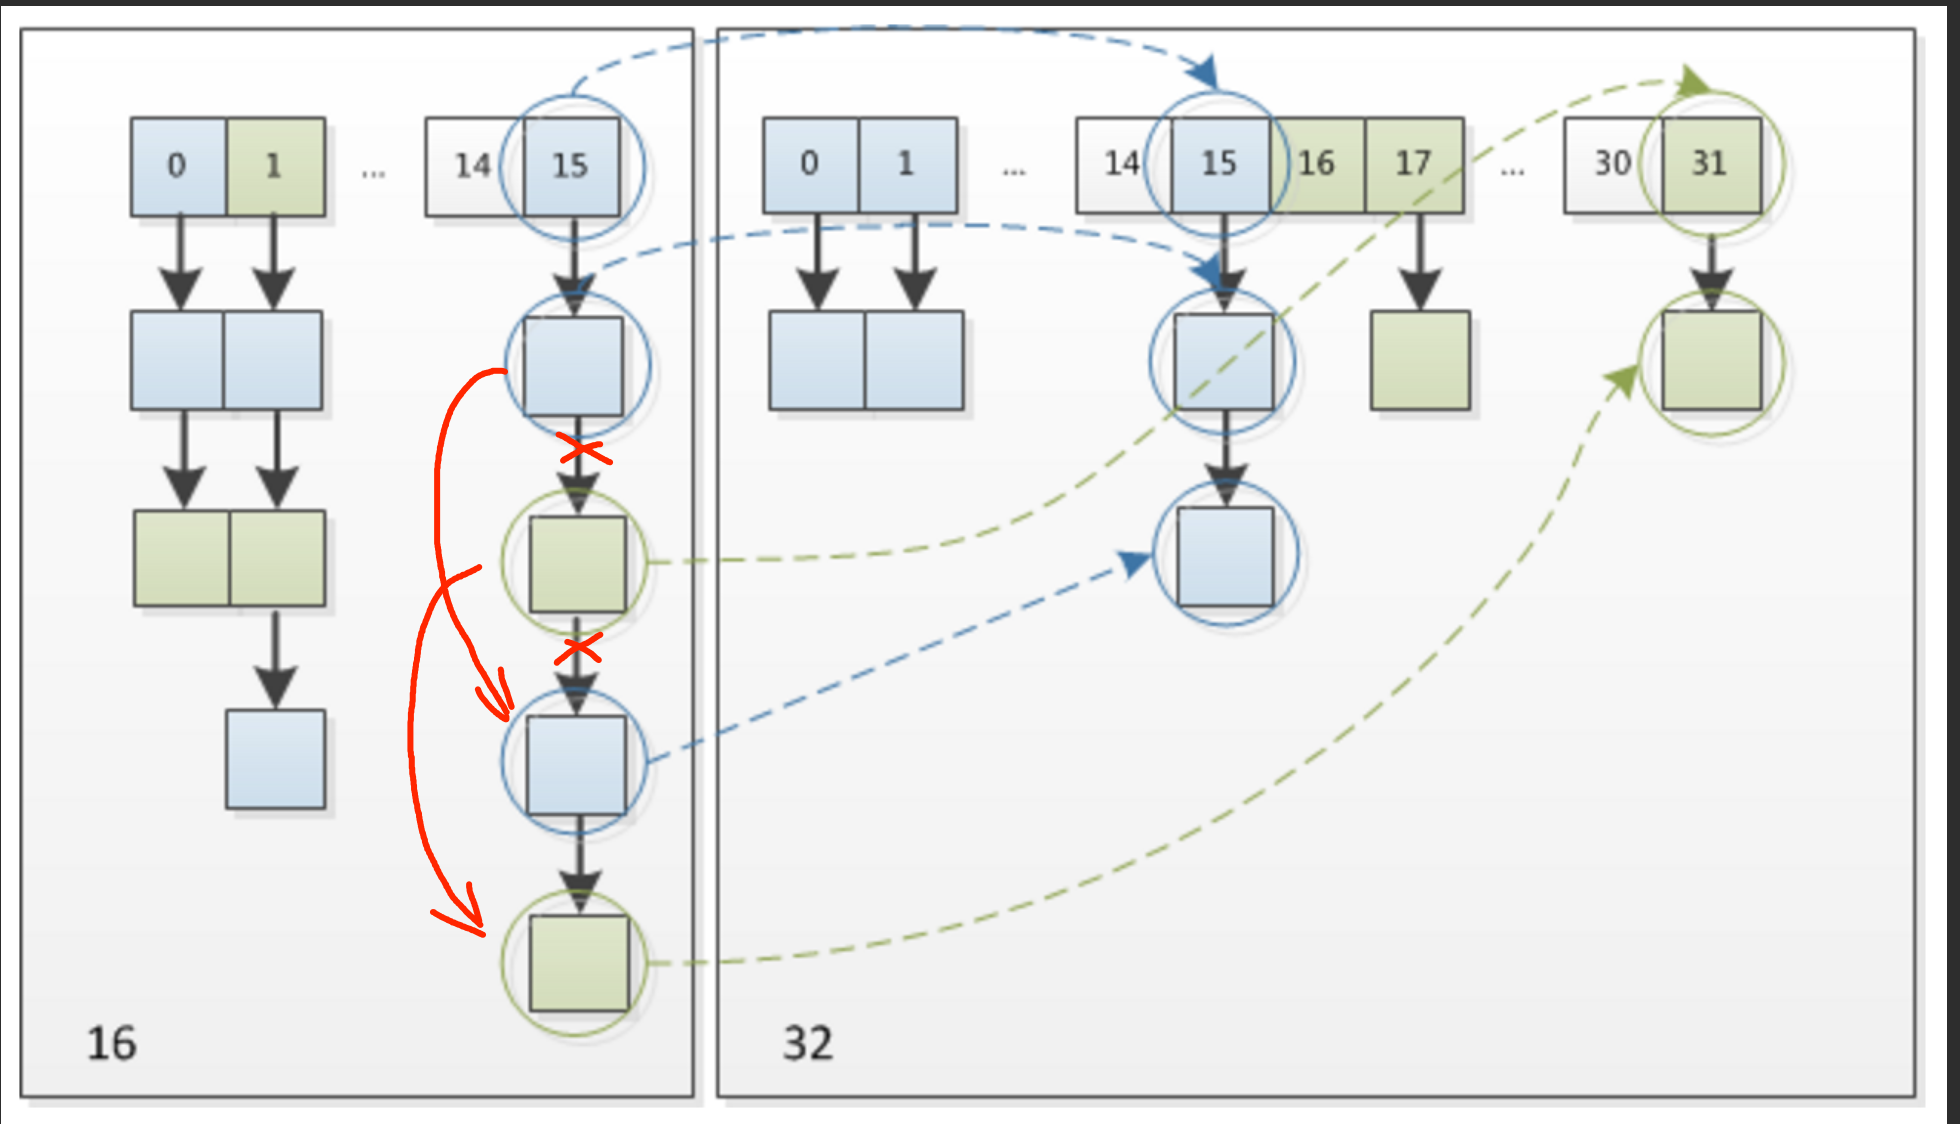
1.8 能避免的原因:1.8 的的 transfer 过程采用尾插法,如图,在针对原数组 15 这个位置的链表进行 rehash 时,如果有其他线程同时执行 rehash。。。。。TODO
[
假设一个线程执行完以后 transfer 以后,下图左侧就是原链表的结构。如果此时被中断的线程开始从头执行 transfer 过程,那么会丢掉部分数据,而不会造成循环。
PS 此处总觉研究起来没啥意义,因为 HashMap 本来就不应该用在并发场景下,再研究在一个错误使用场景下的细节的点没什么特别的意义。
扩容针对红黑树的处理 1 2 3 4 5 6 7 8 9 10 11 12 13 14 15 16 for (int j = 0 ; j < oldCap; ++j) { Node<K,V> e; if ((e = oldTab[j]) != null ) { oldTab[j] = null ; if (e.next == null ) newTab[e.hash & (newCap - 1 )] = e; else if (e instanceof TreeNode) ((TreeNode<K,V>)e).split(this , newTab, j, oldCap); else { } } }
当原 hash 表的节点为红黑树节点时,执行红黑树的拆分,拆分成两部分,一部分在原位置,也就是 j,一部分在 j + oldCap。
1 2 3 4 5 6 7 8 9 10 11 12 13 14 15 16 17 18 19 20 21 22 23 24 25 26 27 28 29 30 31 32 33 34 35 36 37 38 39 40 41 42 43 44 45 46 47 48 49 50 51 final void split (HashMap<K,V> map, Node<K,V>[] tab, int index, int bit) { TreeNode<K,V> b = this ; TreeNode<K,V> loHead = null , loTail = null ; TreeNode<K,V> hiHead = null , hiTail = null ; int lc = 0 , hc = 0 ; for (TreeNode<K,V> e = b, next; e != null ; e = next) { next = (TreeNode<K,V>)e.next; e.next = null ; if ((e.hash & bit) == 0 ) { if ((e.prev = loTail) == null ) loHead = e; else loTail.next = e; loTail = e; ++lc; } else { if ((e.prev = hiTail) == null ) hiHead = e; else hiTail.next = e; hiTail = e; ++hc; } } if (loHead != null ) { if (lc <= UNTREEIFY_THRESHOLD) tab[index] = loHead.untreeify(map); else { tab[index] = loHead; if (hiHead != null ) loHead.treeify(tab); } } if (hiHead != null ) { if (hc <= UNTREEIFY_THRESHOLD) tab[index + bit] = hiHead.untreeify(map); else { tab[index + bit] = hiHead; if (loHead != null ) hiHead.treeify(tab); } } }
那么为什么链表元素超过 8 个转为红黑树,少于 6 个转为链表?
红黑树的平均查找长度是log(n),长度为8,查找长度为log(8)=3,链表的平均查找长度为n/2,当长度为8时,平均查找长度为8/2=4,这才有转换成树的必要;链表长度如果是小于等于6,6/2=3,虽然速度也很快的,但是转化为树结构和生成树的时间并不会太短。
还有选择6和8的原因是:
中间有个差值7可以防止链表和树之间频繁的转换。假设一下,如果设计成链表个数超过8则链表转换成树结构,链表个数小于8则树结构转换成链表,如果一个HashMap不停的插入、删除元素,链表个数在8左右徘徊,就会频繁的发生树转链表、链表转树,效率会很低。https://www.cnblogs.com/aaabbbcccddd/p/14849064.html
引申一 HashMap 的各种遍历方式 1、entrySet + foreach 方式
1 2 3 4 for (Map.Entry<String, String> entry : map.entrySet()) { entry.getKey(); entry.getValue(); }
entrySet 返回了一个 HashMap 内部实现的 Set,他的元素类型是 Entry<K, V>,EntrySet 实现 Iterable,通过实现一个 Iterator 完成遍历。
1 2 3 4 5 6 7 8 9 10 11 12 13 14 15 16 17 18 19 20 21 22 23 24 25 26 27 28 29 30 31 32 33 34 35 36 final class EntryIterator extends HashIterator implements Iterator <Map.Entry<K,V>> { public final Map.Entry<K,V> next () { return nextNode(); } } abstract class HashIterator { Node<K,V> next; Node<K,V> current; int expectedModCount; int index; HashIterator() { expectedModCount = modCount; Node<K,V>[] t = table; current = next = null ; index = 0 ; if (t != null && size > 0 ) { do {} while (index < t.length && (next = t[index++]) == null ); } } public final boolean hasNext () { return next != null ; } final Node<K,V> nextNode () { Node<K,V>[] t; Node<K,V> e = next; if (modCount != expectedModCount) throw new ConcurrentModificationException (); if (e == null ) throw new NoSuchElementException (); if ((next = (current = e).next) == null && (t = table) != null ) { do {} while (index < t.length && (next = t[index++]) == null ); } return e; } }
另外 keySet 本质上也一样,也是通过 HashIterator 作为迭代器。
1 2 3 4 final class KeyIterator extends HashIterator implements Iterator <K> { public final K next () { return nextNode().key; } }
引申:网上大部分的的 HashMap 遍历测试都支出,lambda 的方式性能较差:
1
2
3
map.forEach((k, v) -> { });
比如:https://mp.weixin.qq.com/s/zQBN3UvJDhRTKP6SzcZFKw https://juejin.cn/post/6844904202439753741
资料 https://tech.meituan.com/2016/06/24/java-hashmap.html https://zhengw-tech.com/2019/06/01/java-rehash/